The main takeaway from his talk is to use behaviour trees only after high level decisions have already been made, where their ability for parallel execution of tasks can supplement the cyclic logic of state machines. The rest of this post describes how his approach would integrate with previous camera implementations I have discussed, and applies this new knowledge to guidance of future experiments with behaviour trees on cameras.
In the first post related to flexibility in behaviour trees I argued that behaviour trees and state machines can accomplish similar things, and that there were certain benefits to using each implementation method. I recently watched a GDC 2017 talk by Bobby Anguelov that redefined my perspective on these issues.
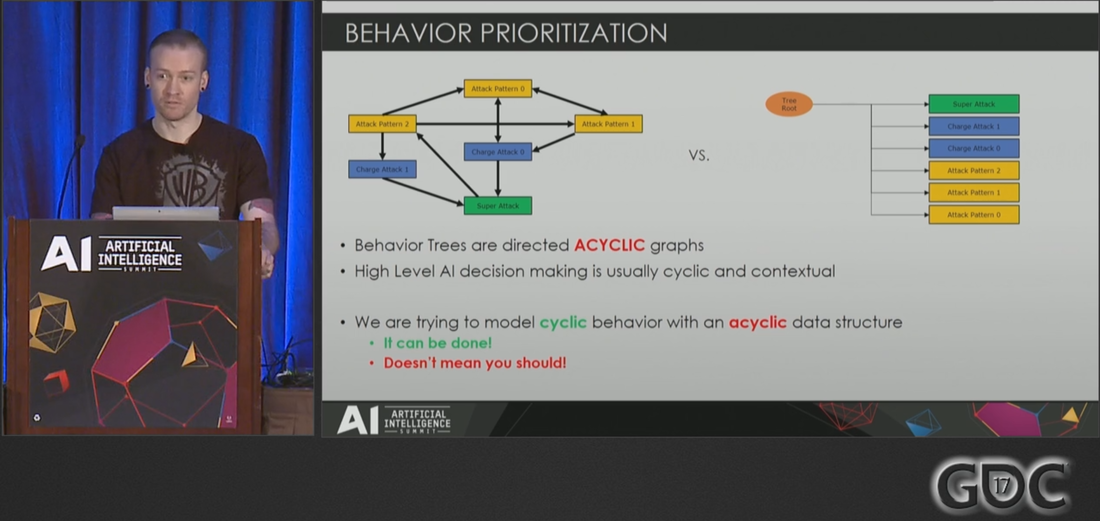
 Much of what I proposed in previous camera experiments models cyclic behaviour on cameras with behaviour trees, and I did not know why that should not be done until watching this talk. In fact, he suggests state machines are clearly better than behaviour trees at high level decision making. He provides examples where the acyclic data structure of behaviour trees complicate implementation and make it inefficient. However, Bobby does not think behaviour trees are all bad.
The main takeaway from his talk is to use behaviour trees only after high level decisions have already been made, where their ability for parallel execution of tasks can supplement the cyclic logic of state machines. The rest of this post describes how his approach would integrate with previous camera implementations I have discussed, and applies this new knowledge to guidance of future experiments with behaviour trees on cameras.
3 Comments
One 1998 Nintendo title made a permanent mark on cameras long before the third person action genre really took off - and it is not The Legend of Zelda: Ocarina of Time. While games like GTA III (2001) and Demon's Souls (2009) both have similar targeting systems to Ocarina of Time, these features were also present in GTA III's precursor Body Harvest (1998) so neither camera can claim as much influence. I am talking, of course, about Super Mario 64, whose success allowed other influential third person games like Resident Evil 4 (2005) and Gears of War (2006) to create their own revolutions. Remember that the N64 controller only had one control stick! The follow camera was a vast improvement from its contemporaries, which were often limited to static cameras as seen in Resident Evil (1996) and rail cameras like in Star Fox (1993). The revolutionary feature in this game is a camera that slowly rotates behind the player to adjust to their movements - notably causing avatars to run in circles when running towards the camera. If you have ever seen this in a game, chances are that camera is a "follow camera" that was inspired by Super Mario 64. There are two camera modes in Super Mario 64: Mario Mode and Lakitu Mode. My project, Super Maria 64, will focus on implementation of Mario Mode. See reference of a player completing the game in Mario Mode here. Lakitu Mode is preferred by many players and aged better with time, but it is basically another layer of features on top of the features in Mario Mode... so we will avoid that complexity. Goal: Go from a blank UE4 level to a prototype quality camera This post documents the first step towards the goal of the Super Maria 64 project, and provides readers with a quick mock-up of the camera lag seen in our reference. I will show video of the final result taken with Sequencer, as well as the blueprints.
Reference: Mark Haigh-Hutchinson. 2009. "Real-Time Cameras: A Guide for Game Designers and Developers." Elsevier. This post is the conclusion to a series intended to share knowledge I found in the resource John Nesky called the "only textbook" in the field of cameras for game design. The final nuggets of wisdom discuss fundamental aspects of any camera. Conveniently, I am beginning to build a new third person camera based on learnings from the Camera Experiments series, and these fundamentals are an excellent place to start - especially as I have neglected sharing them. or even thinking about them. for so long! For the purpose of keeping this discussion quick and to the point, I have chosen to focus on mouse control schemes only. This is a quick primer on how to start your own camera. Here are the final camera design guidelines from Haigh-Hutchinson's textbook, see the previous articles in this series for more of this wisdom.
Animators who use Unreal Editor 4 are already familiar with state machines. Why can't those be used for cameras too? State machines' other benefits include:
When it comes to gameplay cameras, the quick answer to why to choose behaviour trees over state machines is flexibility. Flexibility, in turn, allows the underlying systems to be reusable across multiple projects - and therefore provides more sustainable development practices.
There are practical limitations to using the animation state machines for any camera system that allows real time control by the player. While it would be possible to rip apart the state machine graphical display elements and make their code work with camera behaviours, vanilla Unreal Editor 4 state machines are only compatible with skeletal meshes. This is a common limitation of state machine visual scripting modules because they are often streamlined for animation. As a result, we see similar limitations when using Unity's Mecanim: it is built for blending and transitions between animations that have exact definitions where cameras require adaptive behaviours to address their "fuzzy" constraints. Let's put the implementation of state machine modules aside and look for proof that behaviour trees bestow more flexibility for camera behaviours than any ideal state machines. The purpose of this experiment is to use nonfunctional examples to compare Unreal's implementation of Behavior Trees and State Machines for similar camera behaviours. The "Sense" and "Act" aspects of behaviours were not created. Our starting point for this experiment is any project with Animation Starter Pack, which can be added to your project for free from Epic Games in the Marketplace. While revisiting this experiment, I found the quality of results are greatly improved by removing the BTService_SenseContextOverride and creating new Tasks instead. The "Act" functionality is elegantly replaced by StableCamera and PhysicsCamera nodes that also avoid the unwanted jitter from the previous implementation. The first question I must address here: Why would anyone put a behaviour* tree on a camera? Behaviour trees are a powerful tool that allows designers and artists to visualize logic flow. It is easier for a non-technical person to learn and interact with a visual system that describes the states, than one where they must infer the states. The quick wins of behaviour trees over Blueprint include less rules to understand, clearer visual connections and flow, and nodes can be renamed to disambiguate them from other nodes (all of which help first-time users too). The video above is part of a playlist showing how to implement behaviour trees in Unreal, and is recommended viewing for anyone who wants to have a practical understanding of the features tested in this experiment. Note that we implement very basic triggers with behaviour trees in this experiment, however, these triggers are simple examples and might be better off implemented at the C++ level. Ideally, the process used in this experiment would be applied to empowering camera artists through control of camera behaviours in cases where performance costs are considered less important than giving artists a greater degree of autonomy. This experiment begins where Real Time Cameras in Unreal Editor 4 - Part 12 ends. Also in that article, I mentioned a GDC talk where Jonathan Bard from Ubisoft explains why they implemented a system like this for Prince of Persia. In that game, camera artists were given control of " thinking" for the camera using behaviour trees but camera senses and actions were implemented by engineers. My use of Unreal's Behavior Tree mimics the Decision Graph employed by camera artists for triggering behaviours, but I applied Blueprint for engineering tasks like scripting the camera.
*The answer to the second question is yes, I will insist on spelling behaviour in the Canadian/UK fashion whenever possible. I'll keep Unreal's spelling for their tools. Video: Remi Lacoste. GDC 2013."...Emotionally Engaged Camera... " https://archive.org/details/GDC2013Lacoste
Reference: Mark Haigh-Hutchinson. 2009. "Real-Time Cameras: A Guide for Game Designers and Developers." Elsevier. As we come closer to completing this series of articles, I have a varied assortment of guidelines from Haigh-Hutchinson that I have not shared yet. Many of these guidelines are echoed in Remi Lacoste's GDC Talk on the camera for Tomb Raider 2013, which is recommended viewing for anyone interesting in camera or conveying emotion in video games. His powerpoint for that talk highlights a key difference between the camera I made in Part 10 and the camera it was meant to emulate: "Instead of using an animated layer playing on top of our cameras, we used a physics based camera shake system allowing us to embrace a more custom approach." My Timeline-based implementation served as a good way to experiment with timelines, but in this post I recreate those camera behaviours using physics instead. I found Timelines useful in demonstration of my intention in Hugline Miami too, but ultimately physics provides better implementation when collision is involved. Today's grab-bag of wisdom happens to include three guidelines about camera collision.
Reference: Mark Haigh-Hutchinson. 2009. "Real-Time Cameras: A Guide for Game Designers and Developers." Elsevier.
So far, my focus has been on third-person cameras. I will share some first person camera wisdom from the reference textbook in this post, and also give third person camera examples to contrast between tho two camera schemes. These examples will demonstrate the following three points as they pertain to both first person and third person:
Reference: Mark Haigh-Hutchinson. 2009. "Real-Time Cameras: A Guide for Game Designers and Developers." Elsevier. I was recently introduced to a powerful tool in UE4 called the Timeline. All of my previous articles were created without any knowledge of this tool, but now I cannot ignore the fact it provides simpler and more robust solutions than my previous attempts. This weekend was devoted to creating a platformer style camera that is modelled after Tomb Raider 2013 as a warm up for using timelines. There will be no ledge grabbing, vaulting, climbing, or ice-picks in my prototype - so only jumping and landing from a drop will be covered here. My starting point is the default Third Person Blueprint in UE4.10.3 with no modifications except to create a basic test level that has a lot more jumping and height differences. (Aside: In full scale game production, this level would have all the different sizes and shapes - often called metrics - that the avatar could traverse. so locomotion systems, animations, camera, and controls could be tested before the game world is created).
Notice the cameraman uses a smooth path up, and highlights the gracefulness of the landing by not overtaking his target, the figure skater. The opposite effect is achieved in Tomb Raider when Lara Croft lands a jump, but the camera still has smooth motion throughout the landing. My initial approach is to add a Scene Component to the ThirdPersonCharacter Blueprint and have a new blueprint that tracks the location of this Scene Component. The new blueprint will be the ThirdPersonCameraTarget, and it will use a timeline to track the movement of the ThirdPersonCharacter with velocity dampening.
The first rule of timelines is they can be used on Actor Blueprint Graphs, but NOT Actor Component Blueprint Graphs or Scene Component Blueprint Graphs. This can provide a conceptual barrier for someone who has not used them before, especially when it seems like adding a timeline to a Scene Component Blueprint Graph is the ideal solution. After realizing this limitation, I arrived at two possible options, and chose the latter after running into issues with the former:
Reference: Mark Haigh-Hutchinson. 2009. "Real-Time Cameras: A Guide for Game Designers and Developers." Elsevier. While this is not a continuation of the project I stopped thinking and blogging about in September of last year, it is the result of me continuing to build skills in implementing real-time cameras. The new project involves prototyping a camera for a third person shooter for PC where clicking the right mouse button goes into an over the shoulder view while aiming. A rapid method of implementation for over the shoulder aiming views is described in detail, along with some relevant details on firing projectiles from the camera instead of the player.
I am not following the textbook advice to its fullest extent in this project. In this case I wanted to replicate the third person aiming camera in games, including Tomb Raider, where the camera assists by zooming in when aiming to avoid the accuracy problems inherent to third person shooters. I have chosen initially to snap immediately to the new perspective, which is based on the character controller's facing direction, and not the camera's current perspective. This rapid repositioning of the camera could be jarring or disorienting if the player clicks the right mouse button while facing the camera. I find this intuitive as it follows the convention of fighting games where the player's character can melee attack towards the camera and want to provide this flexibility. I will, however, be watching for signs while others playtest the game to ensure that player intention is maintained. |
Jim Dodge
Game Designer Categories
All
Archives
October 2021
|